Quick Start Guide
- First, you should fill in the master data, such as expense categories, expense items, and leave types. To make this application more suitable for your business, please review the Settings page and adjust the settings according to your needs.
- Add your customers by going to the Clients view. You can access any view by clicking on the menus from the left sidebar.
- Add your projects from the Projects view. Once you have created any project, you can add the project members to give them access in the project. In project, you can add tasks, milestones, files, comments, notes, invoices, log time and track expenses. If you would like to track the time of your project, simply you can use the start timer button located in each project details view.
- Do you have a team and you want to collaborate with them? You can invite or add them manually from the Team members view. Once you've added the team members then you can add the members in your projects, assign them to tasks, send messages, share ideas and files, store their personal, social and work information, etc.
- You can create invoices and send the invoices to your clients from the Invoices view. Make sure you have configured your email settings before sending any email.
There are lots of features, to know more please check the full documentation and see the demo. In this documentation, we'll describe different parts.
Features
A good software can increase your business opportunities, customer & team satisfaction and save your time & money as well. Teamway is amazing to meet all of the requirements.
- Send quotations to your customers and get more work orders.
- Send professional invoices to your clients. Invoices could be linked with projects also.
- Manage your leads in kanban view and move to different stages. Import leads and customers from other services using excel.
- See details of invoices, payments and due of each customer. Add notes, log expenses, share files and events with your customers.
- Add files in projects, give feedback/comments on the files and get notification.
- Add tasks and assign to your team members. Follow-up activities and stay up to date. You can add multiple collaborators.
- Get the details of time spent on a task/project and evaluate the performance of your team.
- Track expenses of projects, team members or in different categories and observe profit/loss.
- Manage your personal events in calendar view and share the events with team members/customers. Define different access permissions for different members. Get project, task and leave overview in the same calendar.
- Add knowledge base articles for your customers to share more information.
- Team members can submit leave application for their absence. Approve or reject the applications.
- Make a road-map for your projects and see visual report in the Gantt chart.
- Define custom role/permissions for different team members and define who can access which modules.
- Share ideas with your team members in the timeline.
- Add private notes and save all useful information. Sticky note on the dashboard can help you to remember important works.
- Use personal to-do list and never forget your daily or upcoming works.
Teamway is a very user friendly software which can increase your team performance and grow business relationship with customers. There are lots of features and lots of configuration options which could be used to make it as a best tool of your business. Check the demo carefully to discover many more features.
Clients
You can create and manage your customers in clients section.

List of Clients
- Create new client using the Add client button.
- Search the existing clients which already added in this application.
- To see the details information of the client click on the Company name link.
- If you need to edit the client's information you can do it using the edit button.
- To delete the client use the delete button. Once you click on the button, the system will delete the client and you will have a chance to undo the action within 10 seconds. If you don't undo the action, the system will delete the client permanently and you will not be able to revert the client anyway!
- If you want to save the clients list in Excel file, you can simply click on this button and the visible clients in the table will be exported.
- If you need to print the clients list, click on the print button.
- You can define the rows per page of the table from here.
- You can filter the clients with your desired client groups.
Add new client
- The company name is an organization you or your organization works for. Even if your client is a person you have to add the information as a company. After creating any client you can add contacts of that client.
Client Details
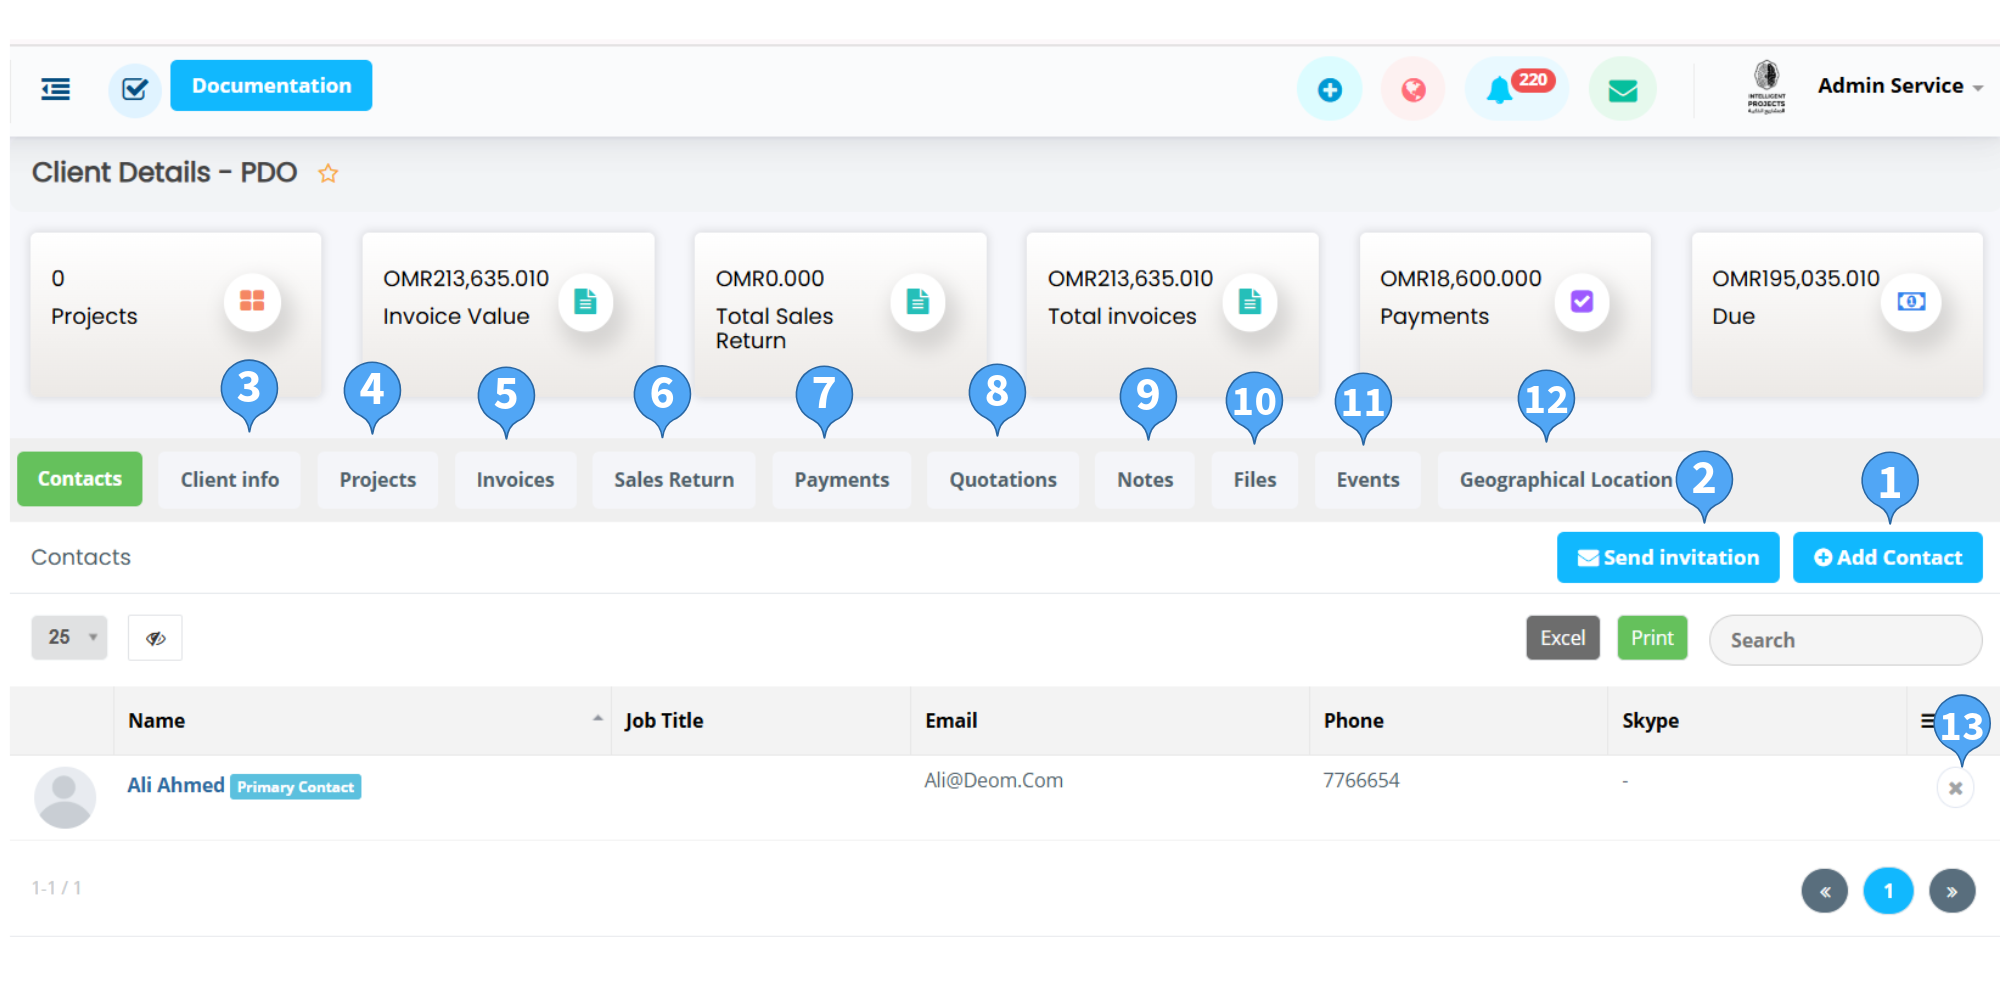
- The contacts tab contains the list of contacts of the client. You can add one or more contact by clicking on the Add contact button.
- To send an invitation to any user for the client, use the Send invitation button.
- Client info tab contains all the informations of the client. You can check/edit the informations from here.
- Projects tab contains all projects of the client.
- Invoices tab contains all invoices of the client.
- Sales Return tab contains all sales return of the client.
- Payments tab contains all payments of the client.
- Quotations tab contains all quotations of the client.
- Notes tab contains your personal notes with the client. Please note that, this won't be visible to client.
- Files tab contains your personal files with the client. This also won't be visible to client.
- Events tab contains all of your events with the client.
- Geographical Location tab contains the location of the client.
- To delete any contact from the client, use the delete button. Once you delete any contact you can undo the action within 10 seconds. If you don't undo the action the contact will be deleted from the client permanently and the contact will not be able to login in the client portal.
Projects
You can create and manage your projects here.

List of Projects
- Create new project using the Add project button.
- To see the details information of the project click on the project title link.
- By default the deadline color is black. If the deadline expires by today then the deadline color will be changed to orange and all expired deadline will be red color for non-completed projects.
-
The progress bar indicates the total progression of the project. To generate this progress bar, we calculate the total completed and non-completed tasks. The tasks points are important to calculate the progression.
Example: If there are 10 tasks with 1 point in each tasks, the project's total point will be 10. Whenever 5 of the tasks gets completed (Task status = Done), the total progress of the project will be (5*100)/10 = 50%.
Same logic applied on the milestone progress bar. - To filter the projects quickly, you can click on the status dropdown. From there, it's possible to see multiple or single status's projects.
- You can filter the projects list by the given labels of projects from here.
- You can filter the projects by deadline from here.
Project Details
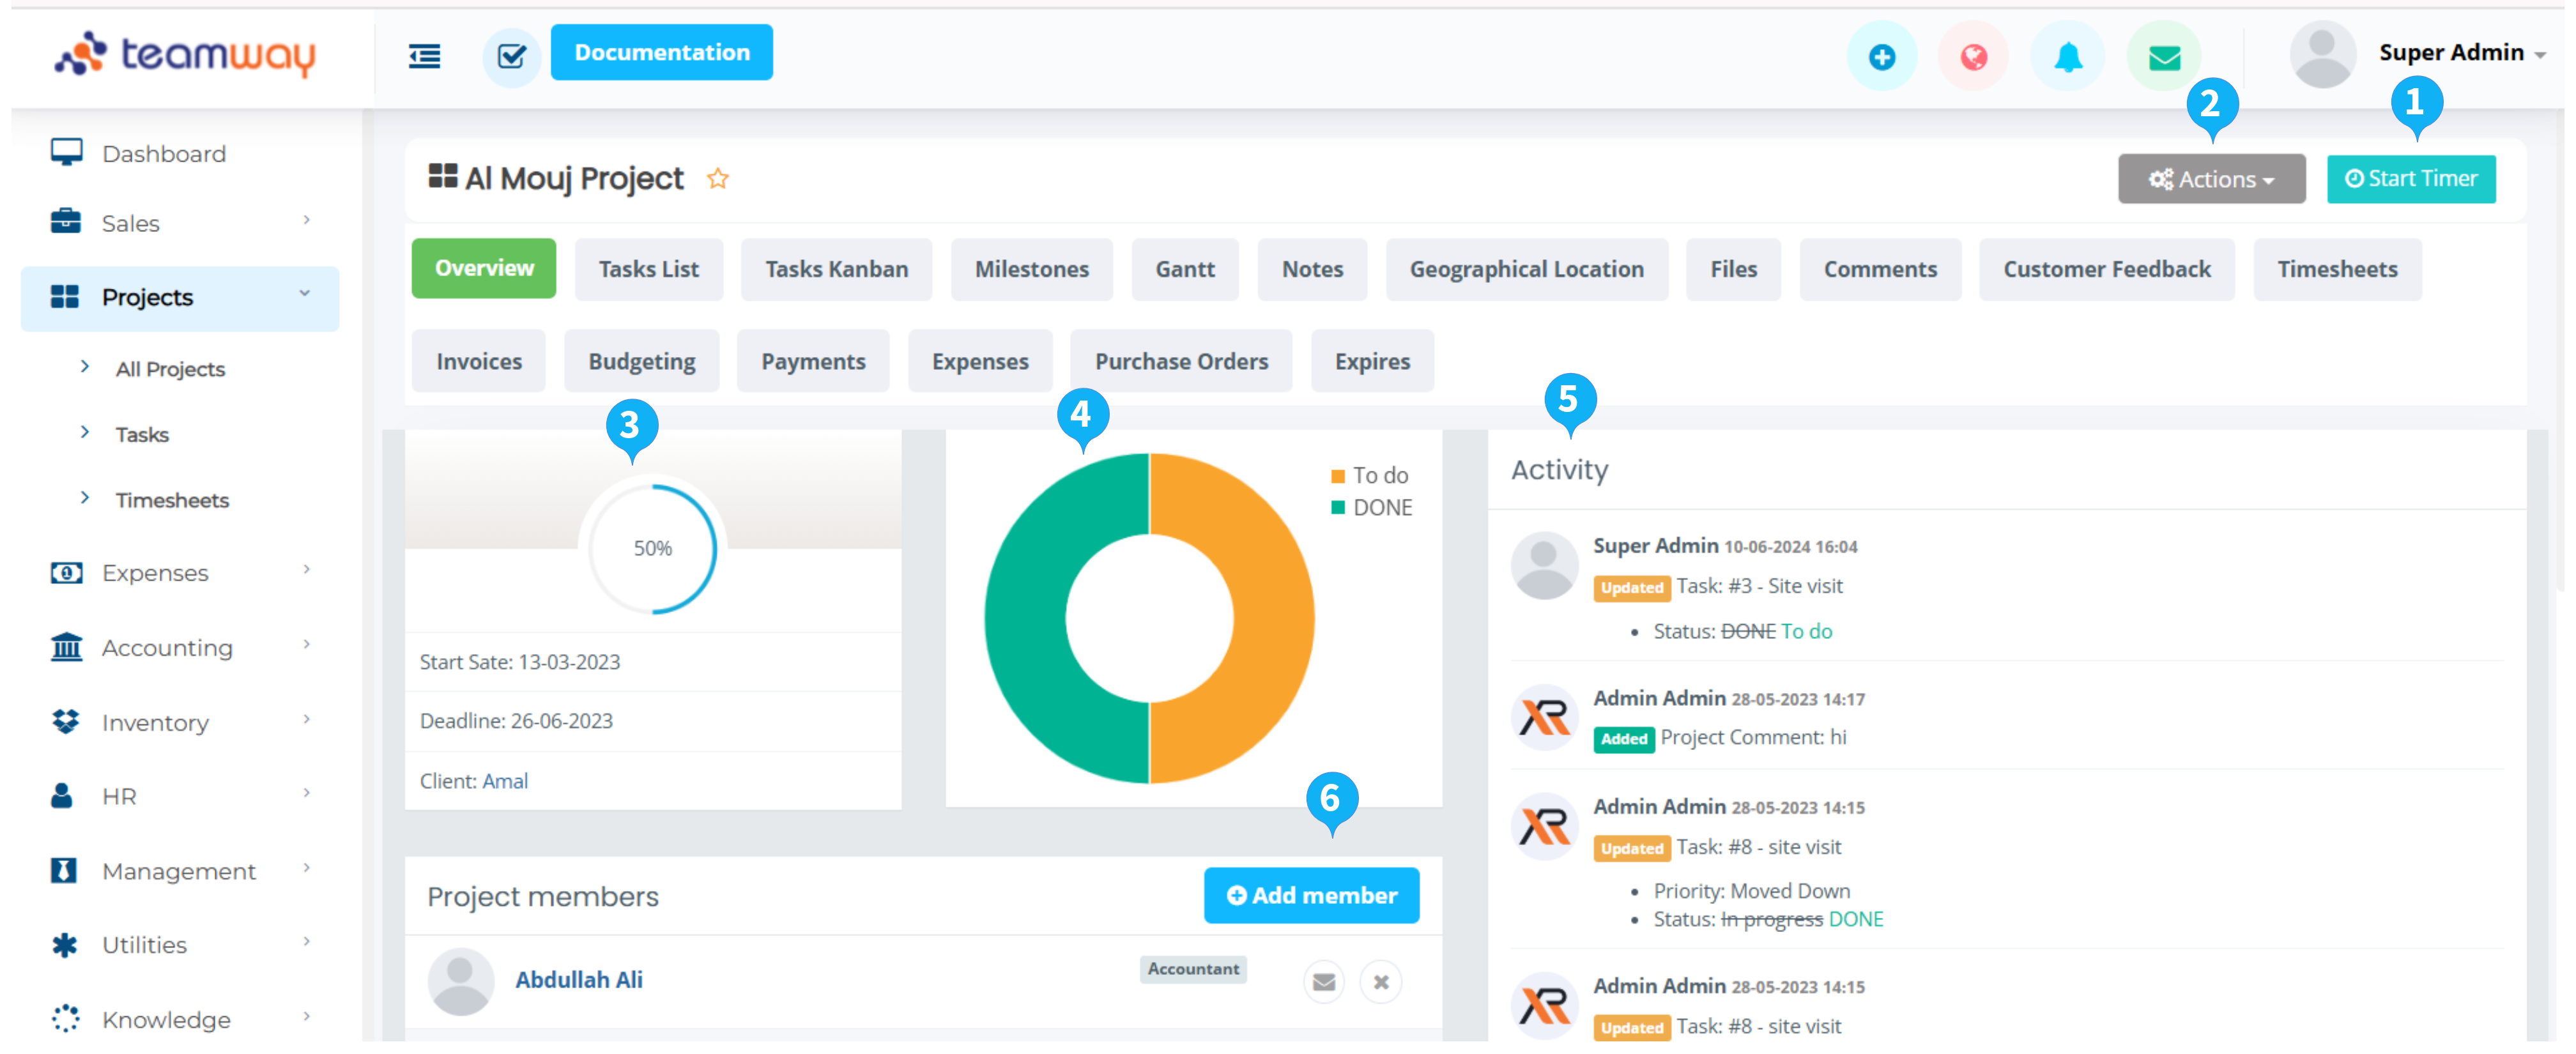
- To track the project time you can use the Start time button. Once you click on the Start time button the timer will be turned on. When you want to stop tracking the time you have to click on the Stop timer button.
- You can edit, clone or change the status of project from the action options dropdown.
- The project progression chart represents the total progression of the project.
- You can see the total tasks status of the project from the chart.
- Activity timeline represents the project history.
- To add new member in this project, click on the Add member button and select the user.
Tasks
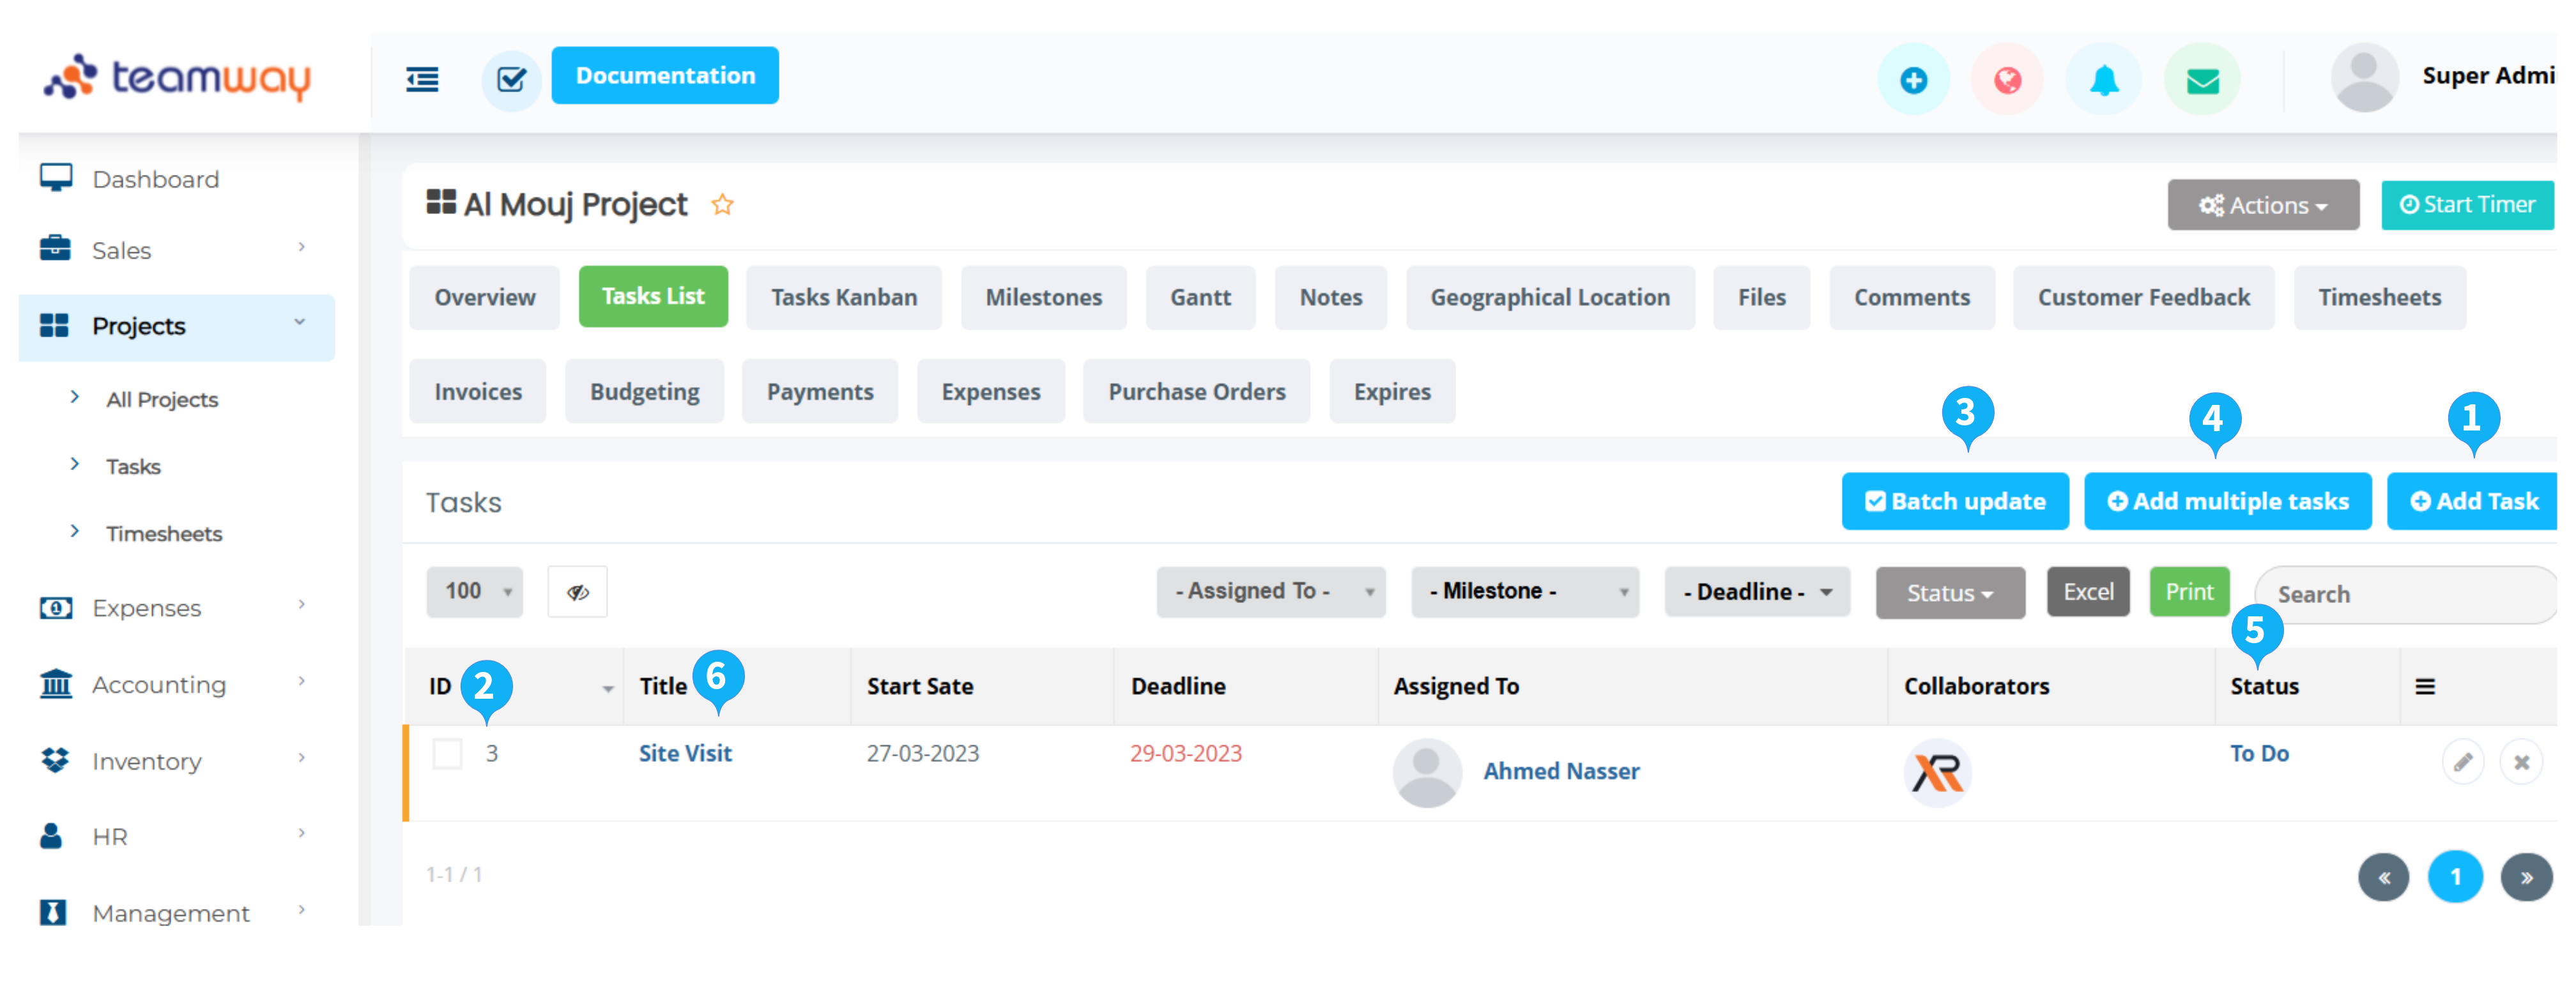
- Create new task using the Add task button.
- You can use this check-box to make a task as done by instantly.
- Suppose you want to change milestones, assigned to, status or other informations for multiple tasks. Then you can simply use this Batch update button. After clicking on this, a selection panel will be appear just beside the tasks. After choosing your desired tasks, click on the Batch update button. Then a modal window will be open. From there, you could select and change which fields you want to change.
- If you want to add multiple tasks without leaving the modal, use Add multiple tasks button.
- To change the task status easily, you can use this.
- To see the details information of the task, click on the task title link.
Milestones
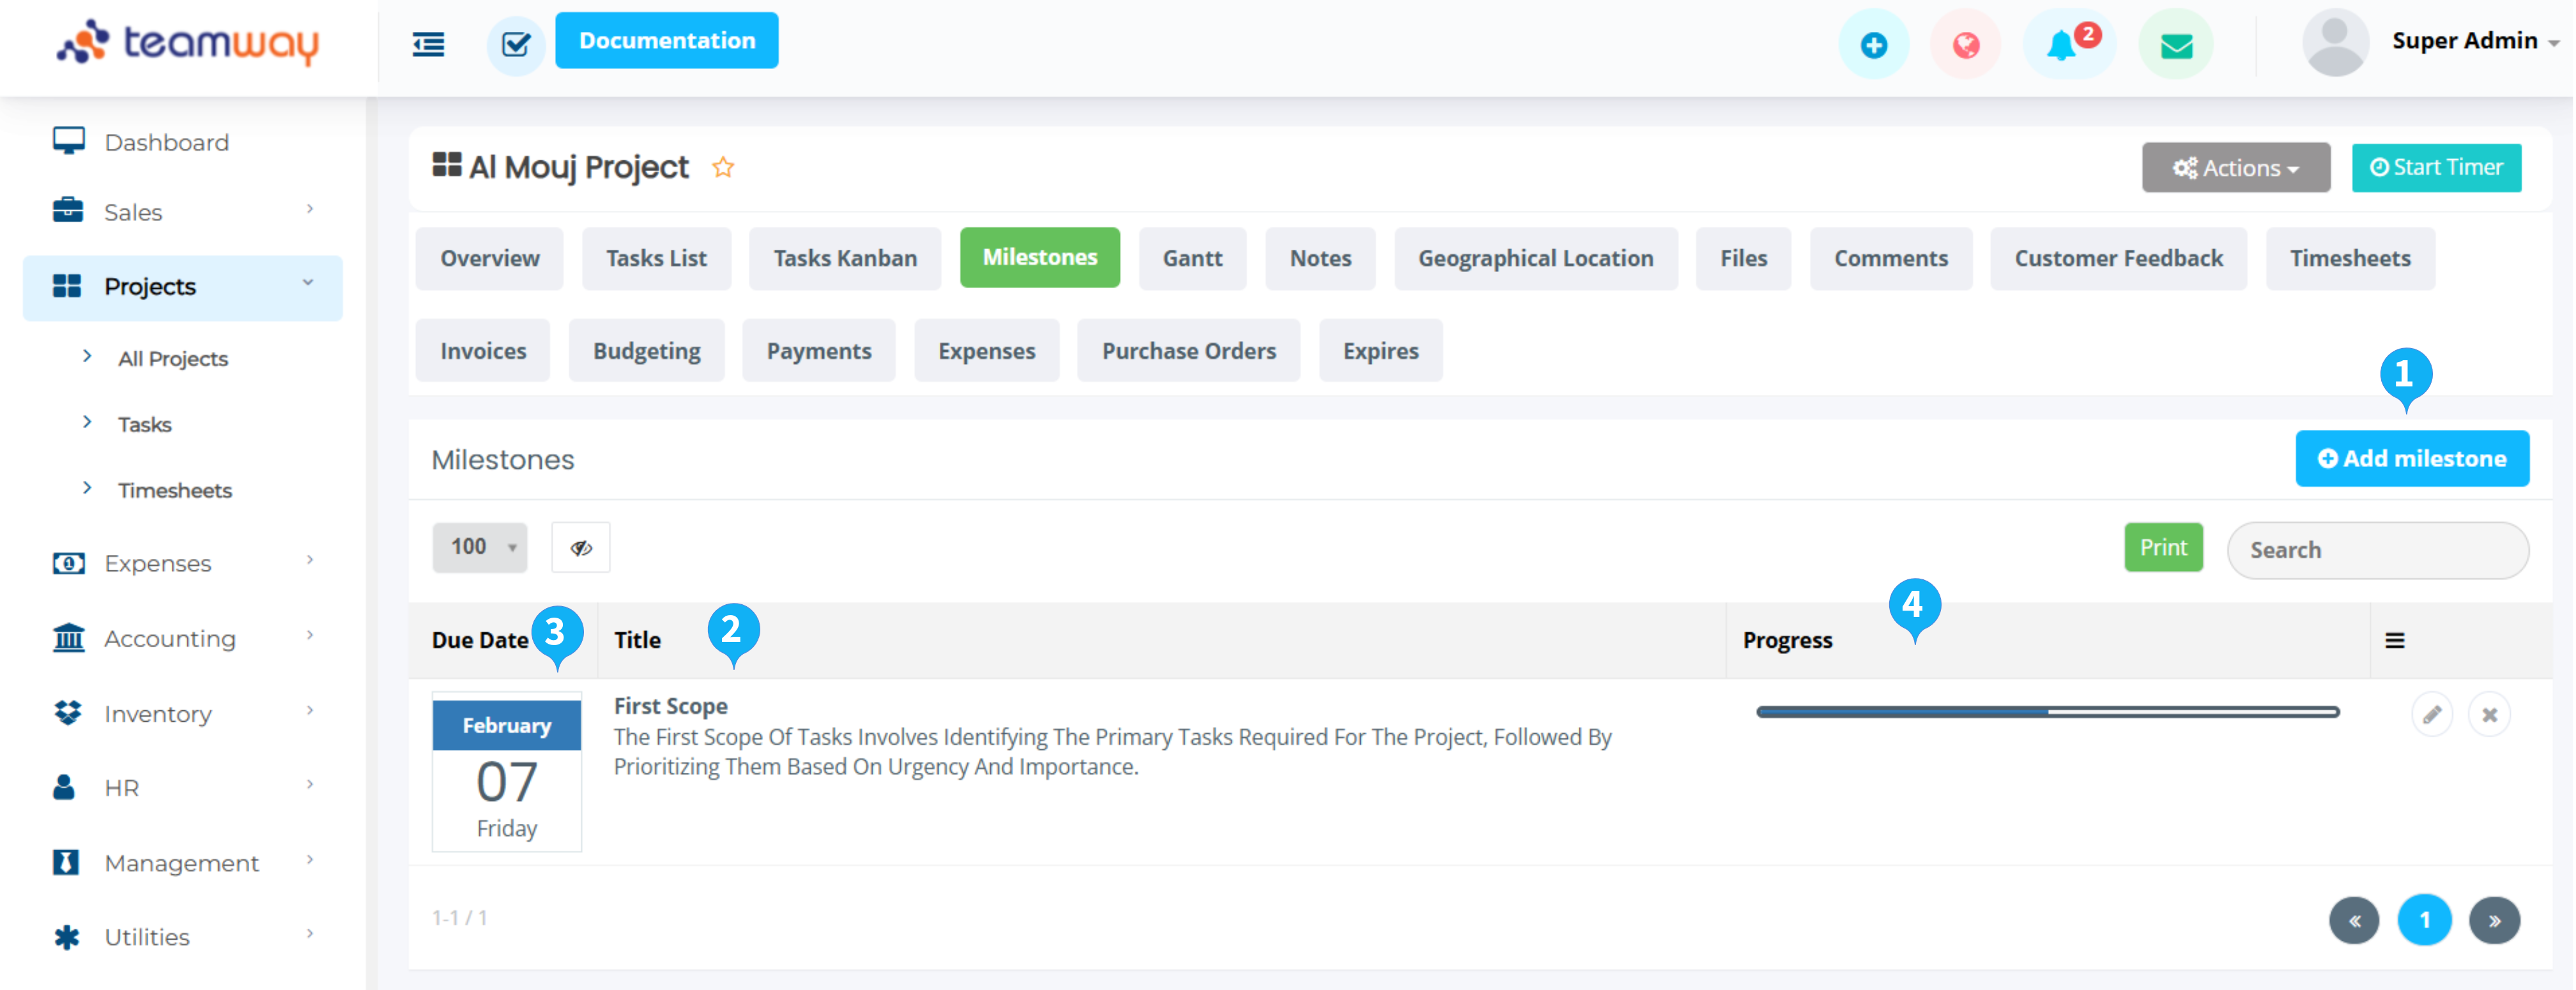
- Create new milestone using the Add milestone button.
- When all tasks of the milestone will be completed, the milestone's color will be Green.
- If the milestone's deadline is expires by today and there has non-completed tasks with this, then the color will be Red.
-
The progress bar indicates the total progression of the milestone. To generate this progress bar, we calculate the total completed and non-completed tasks with the associated milestones. The tasks points are important to calculate the progression.
Here applied the same logic which to generate project's progress bar.
Quotations
You can create and manage quotations from the Quotation List under Quotations menu. Only admin and allowed team members can access the Quotations page. And the clients can see only their own quotations. Admin can define the role of a member to access the quotations.
On the quotation's details page, you can add as many items as you need like invoices.
When you sent an quotation to your client, the client or you can accept/reject it. After accepting the quotation, you can easily create invoice or project from the Actions dropdown.
Invoices & Payments
You can create and manage your invoices from the Invoices menu.
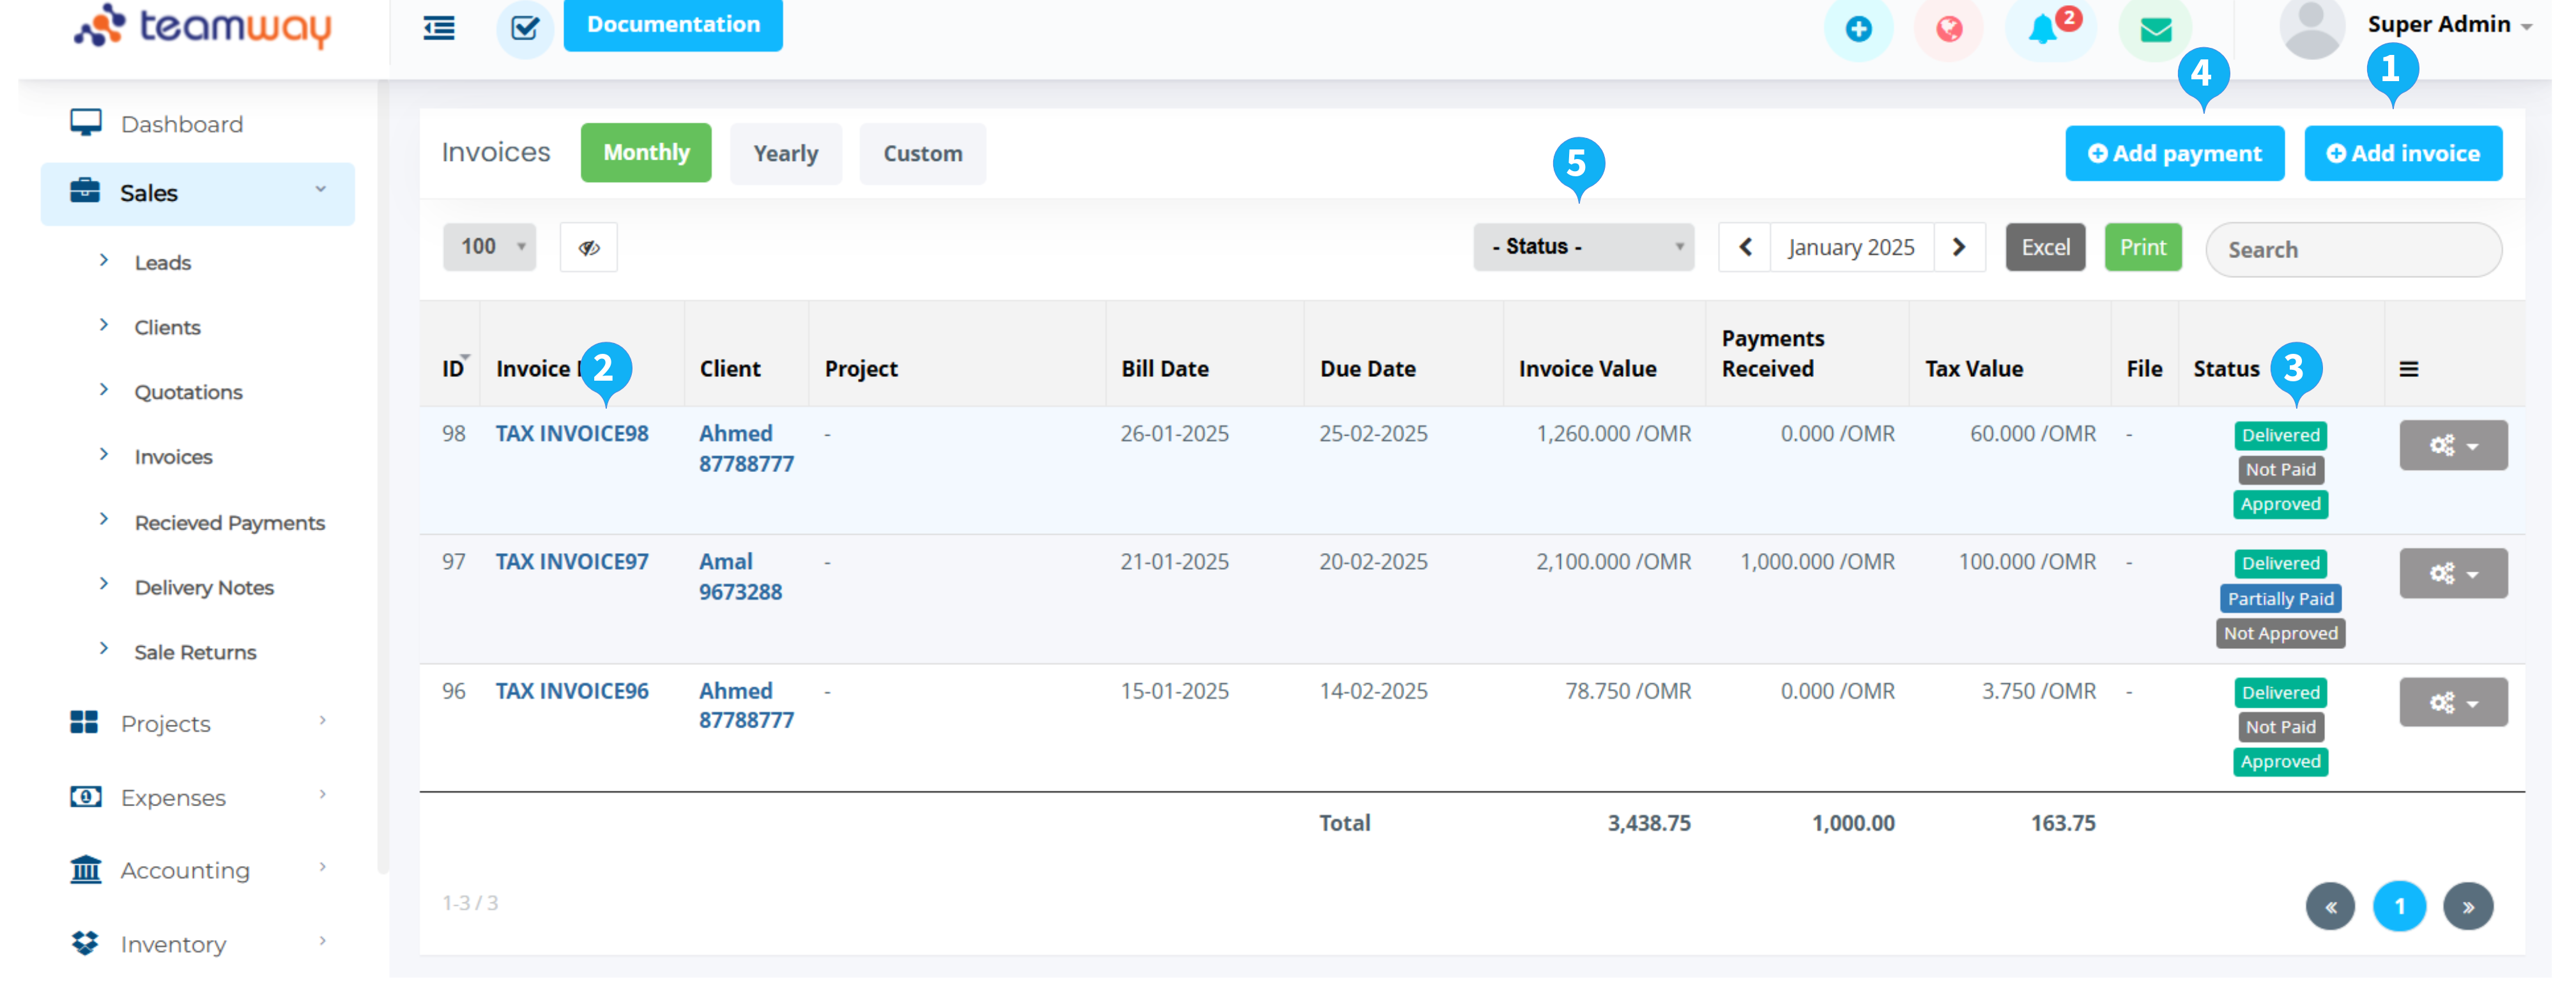
List of Invoices
- Create new invoice using the Add invoice button.
- To see the details information of the invoice click on the invoice id link.
- The invoice status represents the different states of the invoice. By default any invoice will be create with Draft status. Once you sent the invoice to the client then the invoice status will be changed to Sent. Once you receive any payment the invoice status will be changed to Fully paid or Partially Paid. When you cancelled the invoice then the invoice status will be Cancelled.
- By clicking on the Add payment button you will get a modal to add payment in the invoice.
Invoice Details
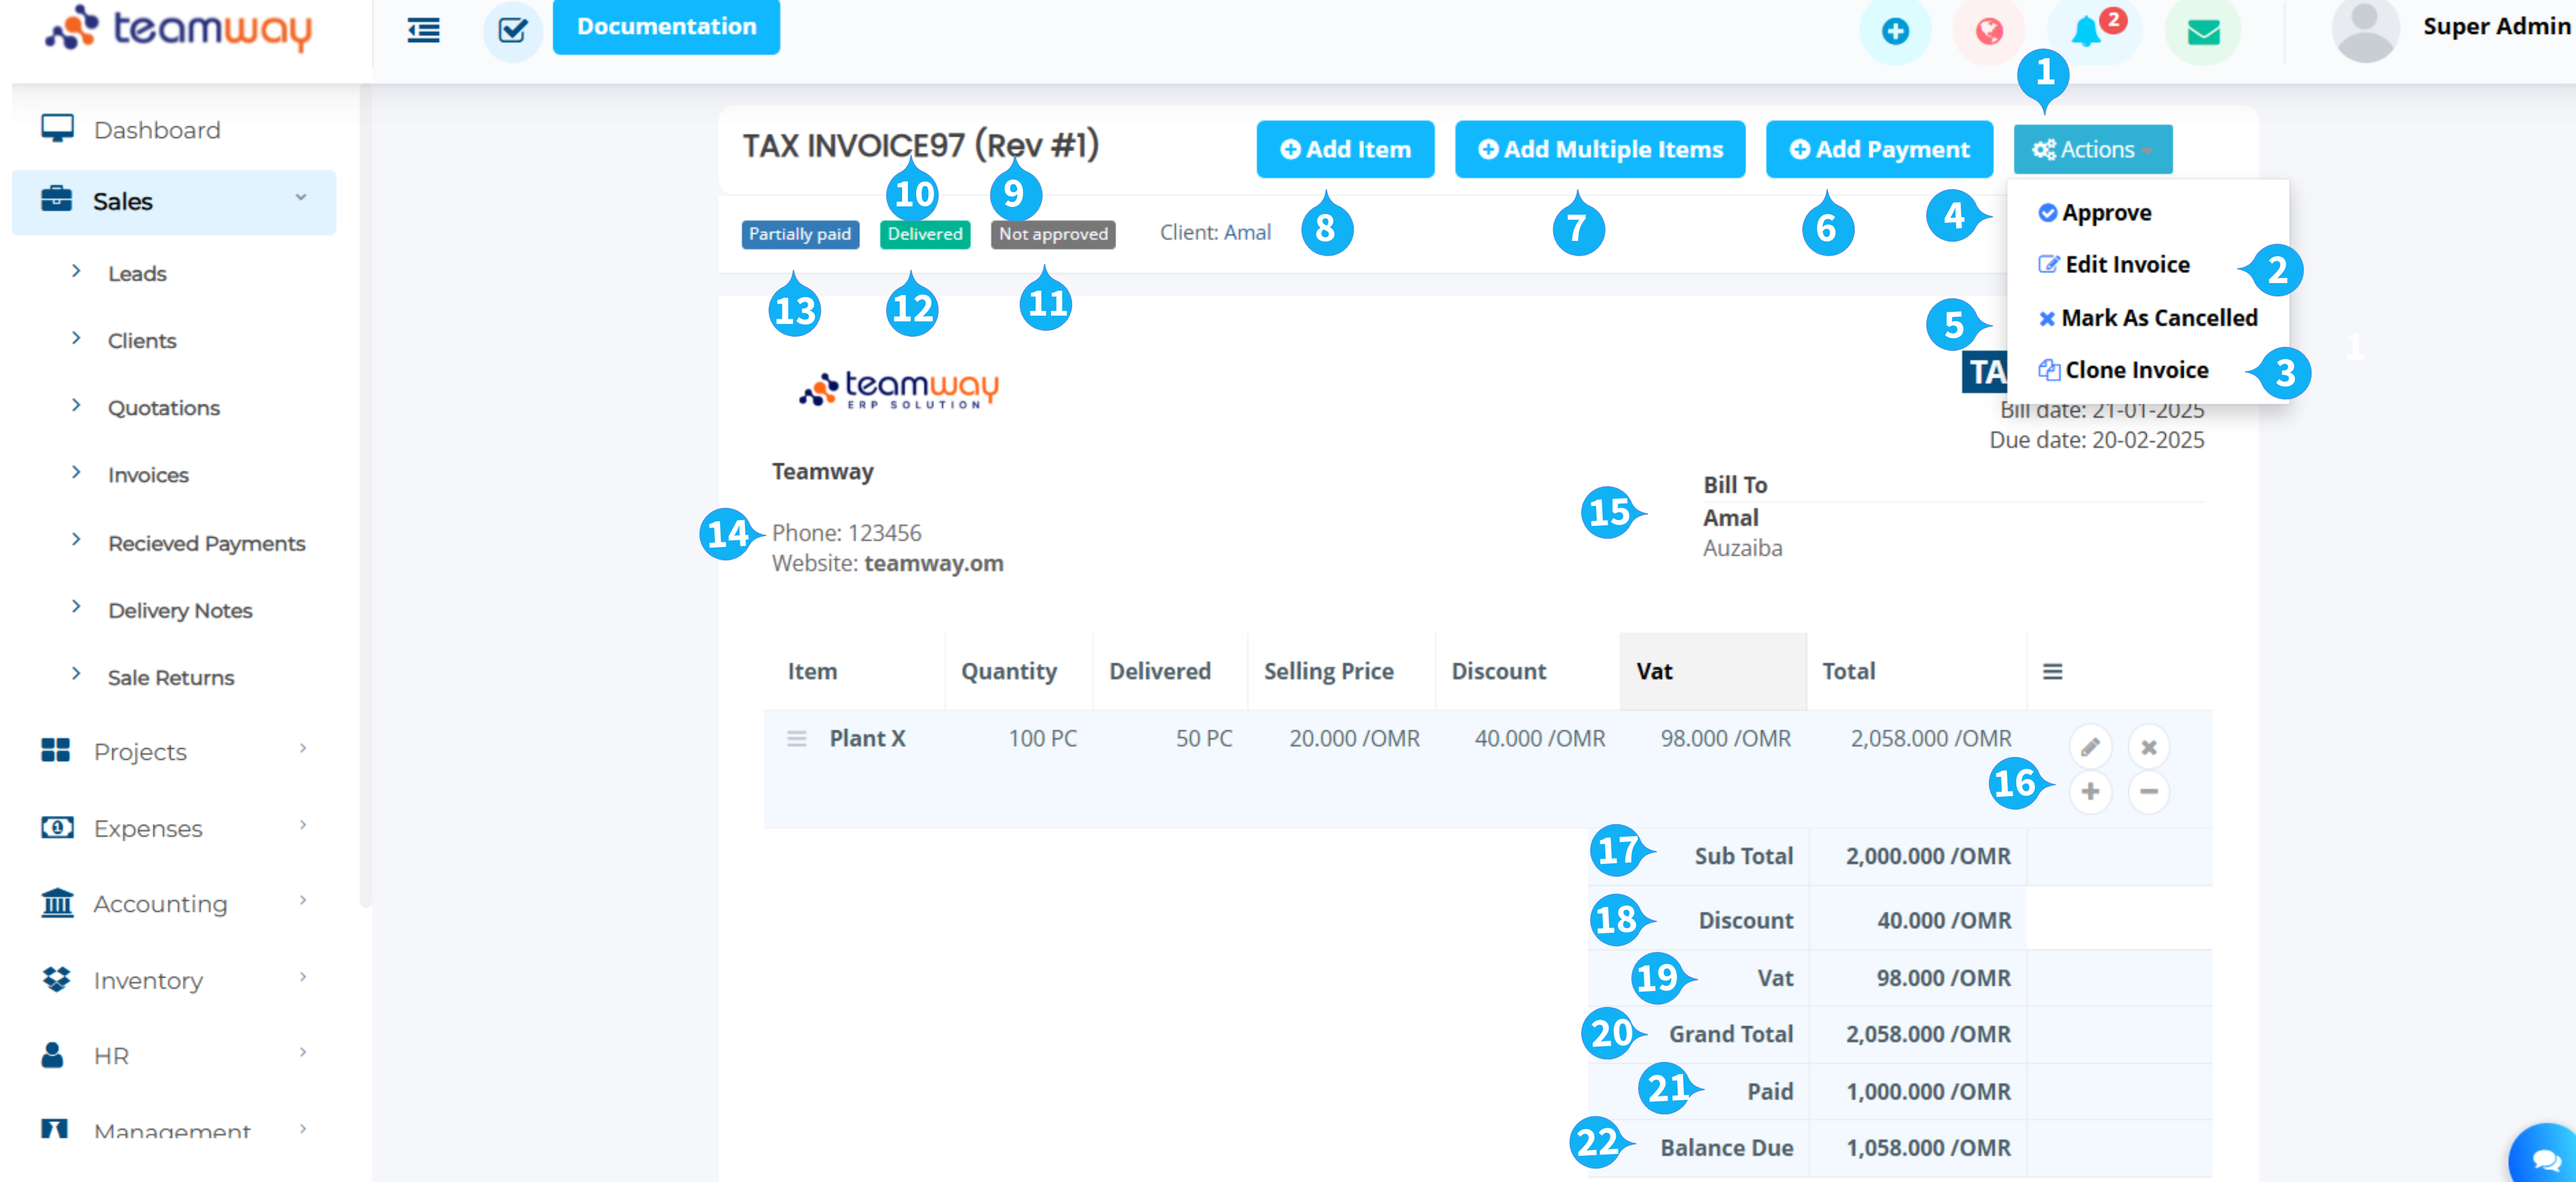
- From action dropdown you can Manage the invoice.
- To edit any information in the invoice click on the Edit invoice menu under the Actions dropdown.
- To copy invoice by click on clone invoice button.
- To approve an invoice, click the "Approve" button. This will automatically generate the corresponding general journal entries for the transaction.
- To make the invoice as cancelled, you can use Mark as cancelled menu. After clicking on the menu, a confirmation modal dialog will be appear. If you confirm from there, this action can't be undone and the invoice will mark as cancelled.
- By clicking on the Add payment button you will get a modal to add payment in the invoice.
- To add many items/products in the invoice, click on Add items button.
- To add item/product in the invoice, click on Add item button.
- A revision number (Rev #NO) will appear if you change an approved invoice back to draft status. This number indicates the revision version.
- The NVOICE #NOI indicates the invoice prefix and number.
- Not Approved This means the invoice status is not yet approved.
- Delivered This means the invoice has been fully delivered, with a corresponding delivery note that accounts for the complete quantity of items invoiced.
- Partially Paid This indicates that a payment has been made towards the invoice, but the full amount is still outstanding.
- This section displays company information.
- This section displays client information.
- This section allows you to manage the items you've added. You can use the following icons: the pencil icon to edit an item, the cross icon to delete an item, the plus icon to increase the quantity of an item, and the minus icon to decrease the quantity of an item.
- Sub Total: The sum of the prices of all items before any discounts or taxes are applied.
- Discount: The amount deducted from the sub total.
- VAT (Value Added Tax): A consumption tax applied to the price of goods and services.
- Grand Total: The final amount due, including the sub total, discount, and VAT.
- Paid: The amount that has already been paid towards the invoice.
- Balance Due: The remaining amount owed on the invoice.
Sale Returns
In this application the sale returns are located in under the Sales menu. Click on the Sale Returns menu to access the page. You can add a sale return by choosing the invoice to be returned after clicking add sale return, from the sale return view the items' quantities can be adjusted incase the invoice is not entirely returned by the client.
Delivery Notes
In this application the delivery notes are located in under the Sales menu. Click on the Delivery Notes menu to access the page. You can add a delivery note from the invoice view by clicking issue stock, next fill the date and note fields and the delivery note will be created, then the items quantities can be adjusted incase of partial delivery to the client.
Expenses
In this application the expenses list are located in under the Expenses menu. Click on the Expenses menu to access the expenses page. Only admin and allowed team members can access the Expenses page. Admin can define the role of a member to access the expenses.
The expenses view represents a list of expenses. Admin can add new expense categories from the Settings section.
Inventory
In this application the following modules: Items, Item Categories, Suppliers, Purchase Orders, Purchase Payments, Purchase Returns, and Shipments. Are located in under the Inventory menu.
From the Items module, the services and products used throughout the system can be added and their current quantities can be viewed and adjusted as well. In here the items default rate and cost can be added and each item have to be related to a category.
The item categories view represents a list of categories. for better classification of items.
From the Suppliers module, suppliers can be managed by listing information like contact details. Their payments and dues are shown as well.
By adding a Purchase Order, The stock will increase and all aspects of the purchase can be managed from the single view like adding payments to supplier and recieving shipments from the supplier. From the list view all purchase orders can be viewed with their details
The Purchase Payments view represents the list of payments to the suppliers. They can be analysed by using the date range filter
Click on the Purchase Return menu to access the page. You can add a purchase return by choosing the releated purchase order to be returned after clicking add purchase return, from the purchase return view the items' quantities can be adjusted incase the purchase order is not entirely returned to the supplier.
Click on the Shipments menu to access the page. You can add a shipment from the purchase order view by clicking add shipment, next fill the shipment date note, supplier invoice details, and supplier delivery note details fields and the shipment will be created, then the items quantities can be adjusted incase of partial shipment from the supplier.
Accounting
In this application the following modules: Chart of Accounts, Account Statements, Gerneral Journal Entries, Banking, Cheques, Financial Reports. Are located in under the Accounting menu.
In the Chart of Accounts Module, existing accounts can be managed and new accounts can be added. Simply when adding a new account you need to fill the fields of parent account, account name, description, and account code which is generated automatically But can be edited as well.
General Journal Entries module is where the transactions are listed both the ones generated from the Teamway operation and user generated journal entries. Click on Add Manual Transaction to create a new transaction. Inside the transaction the journal enteries can be posted by filling the fields of account, amount, narration, and concerned person if applicable.
Banking Module is the interface to view the accounts under the Bank and Cash account group with their balances. From this module a new Bank or Cash account can be added and money transferred between accounts
Cheques Module is where all cheque payments can be managed from the modules of Expenses, Invoice Payments, and Purchase Payments. Cheque Module is where cheque payments can be cleared.
The Financial Reports Contains the Balance Sheet, Profit and Loss statement, Cash flow, and Expenses Reports. Filers can be used to adjust the financial reports.
Accounting Settings
In this application the accounting settings are located in under the Setup inside Settings menu. Click on the Accounting Settings menu to access the settings page. Only admin can access the page. Admin can define how the automatic entries are generated when the operations are approved in the system, for example when an expense is approved.
Set Each Accounting Setting To The Corresponding Account To Map The System Operations To The Correct Account.
Team Members
Using this application you can manage your team members easily.
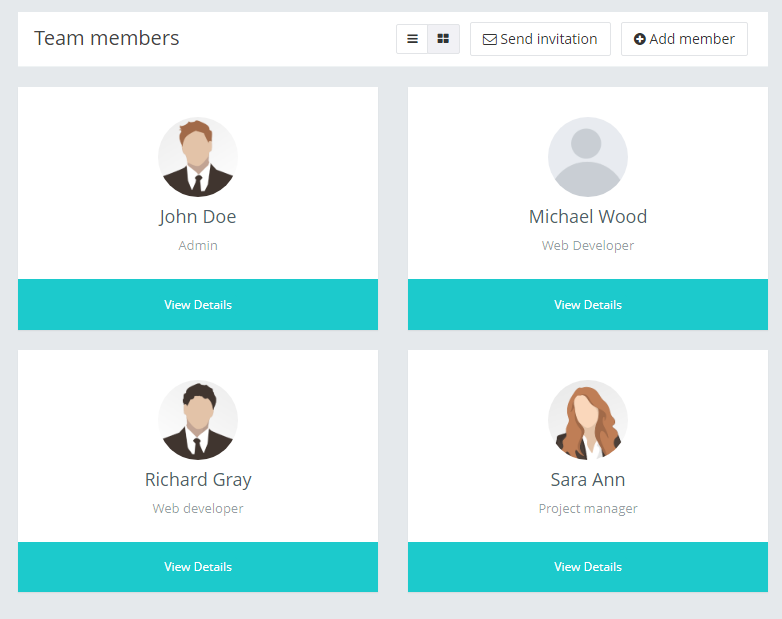
There are two views for team members.
- Whenever you want to add a new team member in this application, you can send invitation to the users email. The user will get an email with the signup instructions.
- Instead of sending invitation to the team members, you can add any team member manually, using the Add member button.
- To view the details of any team member, click on the view details link.
Team member's Details
In team member’s details view, you can see the details information about any member at a glance.
- The Timeline tab represents all the posts of the member.
- You can view or update the basic information of the member from the General Info tab.
- Manage social links from the Social Links tab.
- You can manage the login or access role from the the Accounts settings tab.
- The Job info tab represents the job title, salary and the other job related information.
- From the Leave tab, you can see the details leave history for the team member.
Messaging

All team members can send message to any team member. There are no restrictions to send messages for member to member.
Admin can control the messaging rule between team members.
Whenever you receive any new message, a notification icon will be appeared in the top right section in the application.
Events & Notes
Events
The events page represents a calendar with all events. You can add new event in the calendar. Click on the calendar date to add any event on that specific date. You can define different colors for different events to make the view easier to see.
By clicking on any event, you can see the details information about that event.
Notes
There are two kinds of note in this application. In dashboard, you can save any quick note in Sticky Note. In this application all notes are private (Only you can see your notes).
There are other notes in the Notes page. You can add any private note here. If you add any note in any projects that notes also will be appeared in the notes list.
Timeline
Timeline is a collaboration/conversation area of the team members. All team members can see this view. It's a best place to share any idea or files among the team members.

To share any file you can click on Upload File button or drag and drop files on the box. By default all file types are not supported to upload in the application. Admin can set the settings of accepted file formats in General Settings section.
Leave
This application allows the leave management facility for the team members. The team member can apply for leave and the admins or superiors can approve/reject the leave application. Admins and superiors can also assign leave for subordinates. Admin can create various leave types from the Leave types Setting.
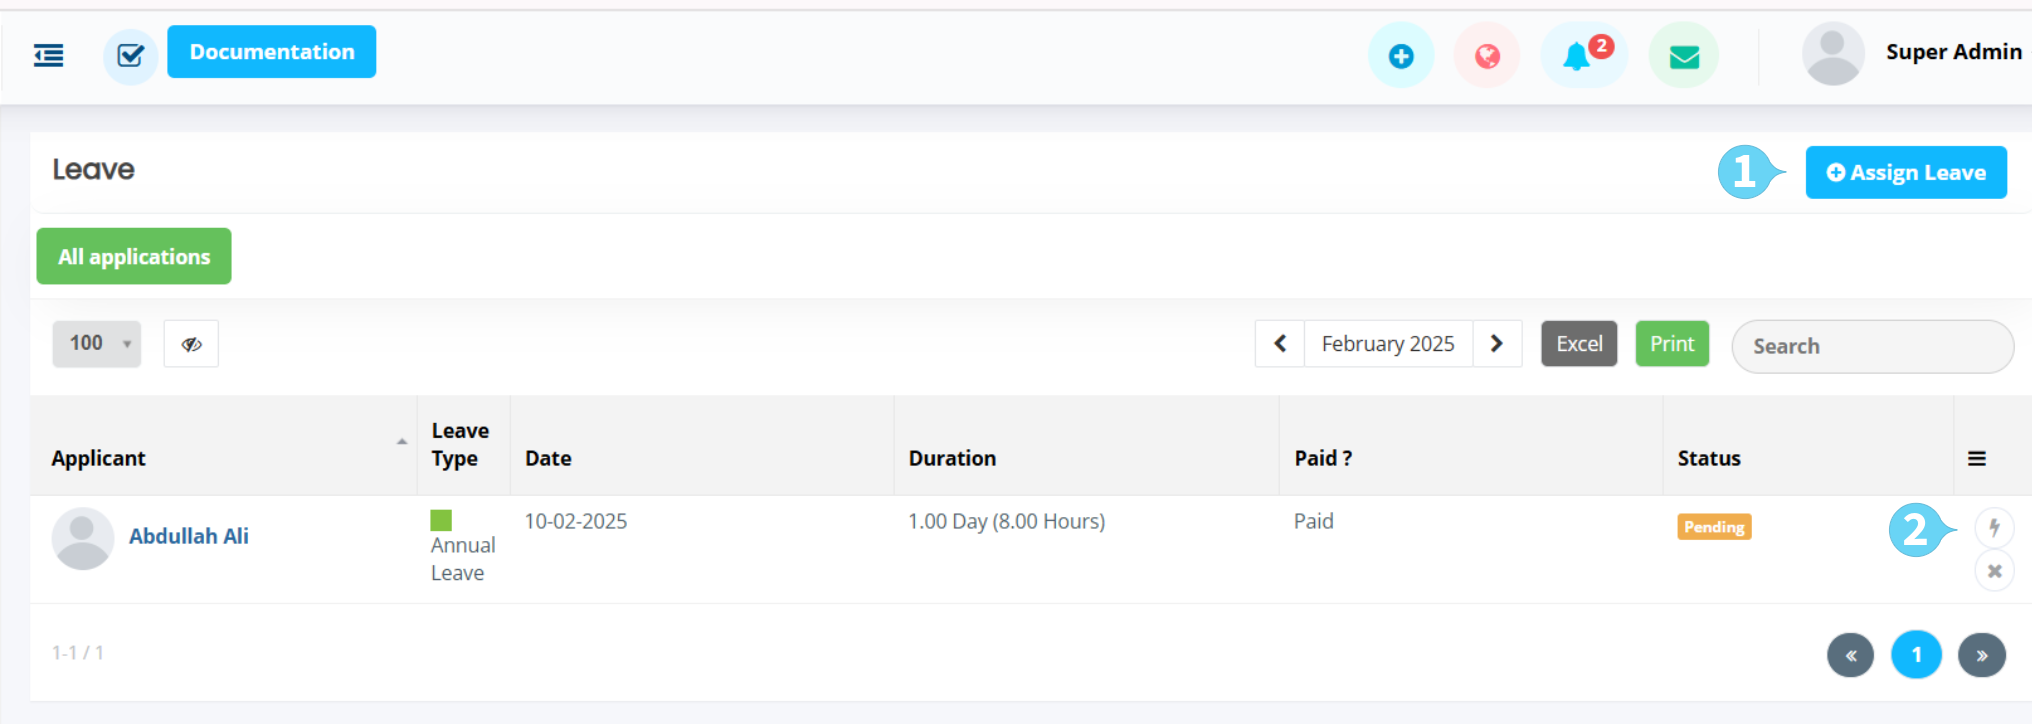
- Admins or allowed members can assign leave for team members using the Assign leave button.
- To see the details information of the leave, click on this icon. From there, allowed members can approve/reject the leave. Please note that, once it'll be approved/rejected this operation can't be undone or change.
Announcements
This application provides the announcement publishing feature. The admins and selected team members can create new announcement for team members and/or clients.
The published announcement will be appeared in dashboard of each user. Once the user clicks on the announcement then it will not be appear in dashboard again. But the users can see the announcement from the Announcements menu anytime.
Settings
The application has various types of settings to make suitable according to your work. Here are some basic introductions about the settings.
General Settings

- General: In this section, you can change site logo, favicon, signin page background, app title, localization settings and file type restriction.
-
Modules:
You can enable/disable your desired modules from here.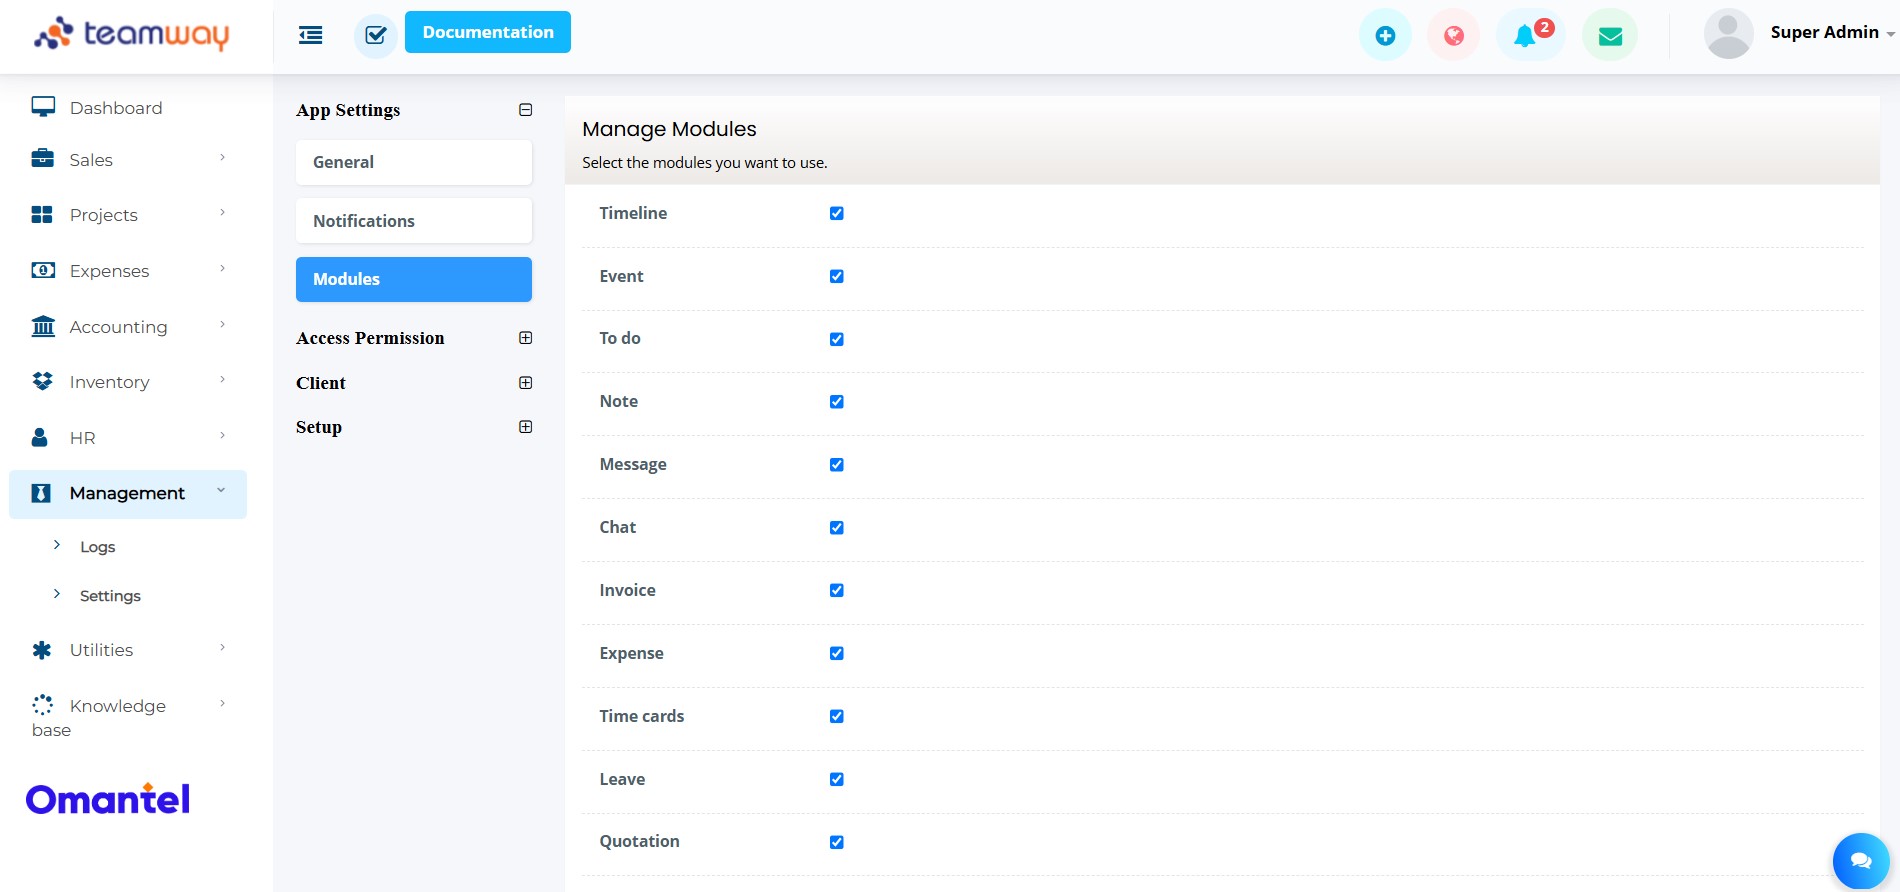
Access Permission
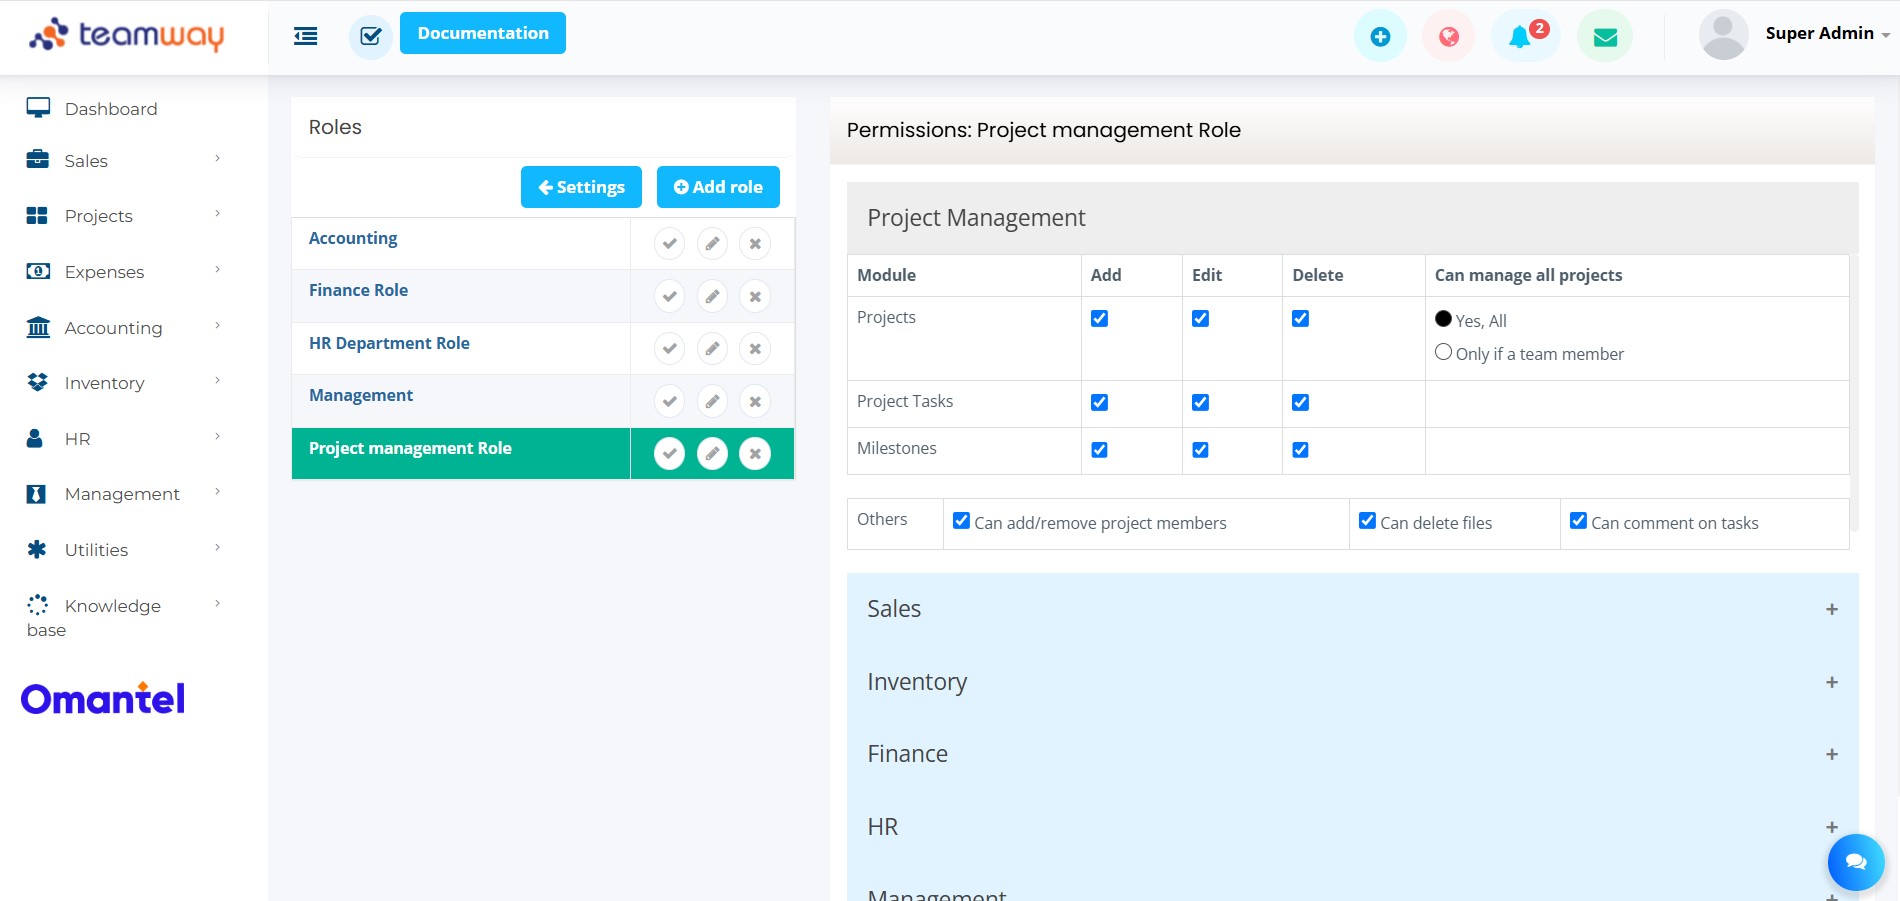
- Roles: It's a setting to set different access permission for different users. To add any role click on the Add role button. Once you create any role then you can set permission to the role by clicking on the role. You'll see different types of access permission and you can choose in your own way. After defining the roles you can set the role to any team member. Each team member can have one role at a time. By default all team members has the Team Member role. To change the role of any team member, go to the team member’s details view and click on the Account settings tab and choose your desired role for the member.
- Team: You can create teams with your team members. So, you can assign role on several team(s), share events and much more.
Client
- Client groups: Here you can create client groups. So, you can easily choose your desired client groups with your clients.
Setup

- 1. Tasks: You can create task status from here. Then you can select the task status from the add/edit task screen.
- 2. Leave types: You can create various leave types from here.
- 3. Expense Categories: There could be various expense types in your business; you can add the types here.
- 4. Add Expense Categories: You can add expenses category by click add category button.
- 5. Expense Items:Here, you can create expense items (subcategories of expense categories).
- 6. Sale Items: For sales items, sales accounting settings allow you to create separate sales accounts for specific sales departments or sections within your chart of accounts. The sales account should be assigned to approved invoices, and the cost of goods sold (COGS) account should be assigned to approved delivery notes. If you prefer not to manage numerous sales accounts, you can use the default settings.
- 7. Invoice: There has some invoice settings to make things ease. You can change your invoice logo, invoice style, invoice reminders and more.
- 8. Quotation: There you can change your quotation logo, quotation style and more.
- 9. Nationality: Here you can create various nationality.
- 10. Company: You can setup your company informations from here. Then it'll be available on Invoices and Quotations.
- Taxes: In this application the taxes are using in Invoices and Quotations. You can define different taxes name and percentage here.
Knowledge Base
You can add Knowledge base articles for your clients.
You can create or manage Categories and Articles in the Knowledge base menu.
Once you'll add Categories and Articles, they'll be appear by category-wise on Knowledge base.
Thanks
Thanks again for purchasing this application. We are trying to add and improve new features regularly. Hopefully you'll enjoy using the app. If you have any query or suggestion, please send an email to support@system.teamway.om
Best wishes
Teamway Team